A demountable camper is simply one that can be removed from the vehicle. It's ideal to make use of the vehicle on it's own, or to put a little home from home down in any place you like.
The following article will elaborate on the building technique.
You can click on any picture to see a full size image.

The vision for this project was to create a traditional looking timber removable camper unit with lots of modern comforts. She's fully insulated, has solar electricity with 12v outlets and an inverter for 240AC power. There's a full kitchen with running water, a fridge, twin hob, grill and a heater. It's all double glazed for both sound and heat insulation.
The camper unit can be removed from the pick up truck in a little under twenty minuets.


Camper unit weight 890kg
You're welcome to contact me if you have any questions.
info@handmadematt.com
The base vehicle for this project is a Mitsubishi L200 pick up truck. It has a powerful 2.5TD engine and four wheel drive transmission. The ideal "go anywhere" camper, towing vehicle and multi purpose rural machine. I spent a long time researching and browsing until I found this one. It's a 1999 model which I like because it's not as modern and computerised as todays vehicles, it's solid, tried and tested tech. It has only done 70,000 miles (nothing for a diesel like this) It has a full stamped service history from Mitsubishi and has good body work indicative of only light use.
(Not being destroyed by a tree surgeon, farmer of off road enthusiast like so many are.)

First I made some detailed measurements of the truck and drew up some plans just to show the dimensions. I created a quick sketch so that I at least had something on paper! HaHa, this was the only drawing of the whole project. The rest simply came from my creative flow in the moment (and some nights lying awake half dreaming about the possibilities.)
I pretty much made it up as I went along, I was not working from any plans but a creative vision which I just let flow through me.
My favourite and relevant building quote is:
"I just get the bullet out of the gun and then I run after it to get it to hit the right spot"
Lloyd House - A builder featured in Lloyd Kahn's book - Builders of the Pacific Coast.
(A series of books which I highly recommend and have been a massive influence and inspiration.)

The jacking points for the legs (being demountable) needed to be of steel box section construction to receive the jacks. These were the first things I made. The 50mm box section will accept 50mm timber to extend into the frame. See below.

This is their positioning within the frame having been primed and painted:

Here is one fitted with the timber and bolted into place. You can see the hollow box section facing out from the vehicle. This will accept the jacking leg.

You can see the steel jacking points on the overhanging corners of the floor pan of the camper unit here:

Once the floor pan was completed in a shape to fit around the wheel arches of the loading bay of the truck I started constructing upwards to create the walls to support the roof. I always like to build a roof at the earliest convenience because it offers shelter from the elements for the remainder of the build.

The roof is corrugated tin. I met a farmer who has a machine from the second world war that bends curves from flat sheets. It was used to make air rade shelters and huts. It's clearly still going strong today!

Some examples of my joins using coach screws:


The first insulation to go in is for the cavity under the bed (over the cab.) See below. I always use loose rock wool insulation in horizontal spaces because it's super cheap (subsidised by the government, thank you very much.) For vertical insulation I tend to choose solid, rigid insulation boards to save from it settling down in the cavity over time. Celotex is a brand name of a super high rated insulation that I would recommend (I used this in the roof.) Polystyrene board is also good and much cheaper. Neither are very ecological as a one off packaging, but I feel as insulation that will last many many years that it is more justifiable.

I added some more triangulation into the frame and inserted the salvaged recycled timber window frames.

I skinned the whole shell in recycled PVC plastic sheeting as a damp course. This will stop general moisture and rain from finding its way into the structure. A super cheap and very important step!

This was when the first cladding went on. I used feather edge board that's been treated. It's very cheap and easy to work with. The cladding both inside and out offers huge strength to the frame, effectively triangulating every shape to stop any lateral movements.

Here's a photograph of the 50mm of insulation being fitted into the cavities between the timber framing.

Being a tin roof (good conductor) the insulation will prove to be very important to keep the camper cool in the sun and warm at night. First I skinned it with a foil lined air bubble sheeting which has a very high rating for it's size and weight. It's also a moisture barrier. I sealed all the edges with a foil ducting tape as well. The purpose for sealing it so well is to stop warm humid air inside the camper (breathing, cooking etc.) from finding it's way into the ceiling cavity and coming in contact with the cold metal tin roof at night. This would cause a lot of condensation which would drip down to the walls and cause damp and eventually rot. Again, things like this are very important to think about. Without proper construction like this a build could be condemned in as little as a couple of years.

After the foil lining 50mm of Celotex was fitted into the roof cavity. You can also see the beginnings of the bamboo trim of the interior.

Here is a 50mm underfloor insulation layer.

Having built the door frame, I started construction on the door. Doors are rather complicated to build. They have to be strong and secure and they must fit within a few millimetres of precision.

It's a stable door wich means the top can be openend separately which is nice for privacy and security. The door's fitted with a closable vent in the bottom and a domestic Yale lock. It's very solid and secure.

The interior was lines with 3mm hardwood ply. It's lightweight and looks fantastic.


The beautiful grain in the ceiling is a joy to explore when I'm lying in bed.

As for mounting the camper onto the truck I fabricated six of these steel brackets. They are lined with foam so as not to damage the mounting rails on the camper.

There are 12mm steel coach bolts that are located through structural elements of the camper, they have metal spreading plates on the inside to make them as strong as possible. They line up with the side mounting rails of the truck and with the bulkhead behind the cab. They then do up with locking nuts to hold the camper on securely.


Here is a photo of the unit being demounted.


The beautiful trim on the front is waiting for some gypsy style art work.

BEHIND THE SCENES
There's lots of technical bits and pieces that go into making a camper a home. Gas and water plumbing, electrical systems and ventilation.
Here are two 85ah deep cycle batteries. These are going to be the auxiliary batteries for the camper unit. They are wired together in parallel to give 170ah total and remain at 12volts. This is a pretty decent power capacity for a portable system.

On the roof are mounted two 100 watt solar panels. Being a curved roof they having slightly different aspects. The good thing about this is that it increases the chances of one facing south when parking randomly!

The power from the solar panels leads down to the silver box on the left. This is a charge controller. It monitors the PV (solar) power and the batteries status to deliver optimum charge characteristics and to avoid damaging over charge scenarios. It's an MPPT controller (maximum power point tracking) which basically means it optimises the PV output voltage and amperage to deliver the maximum watts (power.) They are more expensive but will give you maybe 10% or more juice from your system.
The blue box on the right is the inverter. This creates 240volts AC from the 12volts DC for running domestic appliances.
There's also an auxiliary charging circuit from the vehicles electric system. When the engine is running the auxiliary batteries in the camper unit are charged and the fridge is run. (The fridge uses a lot of electricity so when parked up camping it is run from the gas supply. Ironic, cooling from a flame... magic.) If the camper were to be in a guaranteed full summer sunny location the electric system could run the refrigeration but it would be quiet taxing.

Here is a small PV computer that's mounted externally from the electric locker. This displays all sorts of valuable information about what the system is doing. The small black switch just to the right activates the inverter. This saves having to leave it on all the time (they have a small background current drain even when there's no load being used. It's not much but it's worth turning it off. Every little helps!)

This is the utilities locker. 50litres of water, 170ah of 12volt battery storage and 7kg of butane gas all live in here. The white bucket is an emergency use sawdust compost toilet. This is only really an option in a weekend van where you have a base at home to process the waste. (Unless you want to be regularly digging large holes in the woods which is the only other ethical way to dispose of the sawdust/ waste mix. Simply dumping it is not good.) There's heaps (excuse the pun) of highly recommended information in Joeseph Jenkins book "Humanure - a guide to composting human manure."

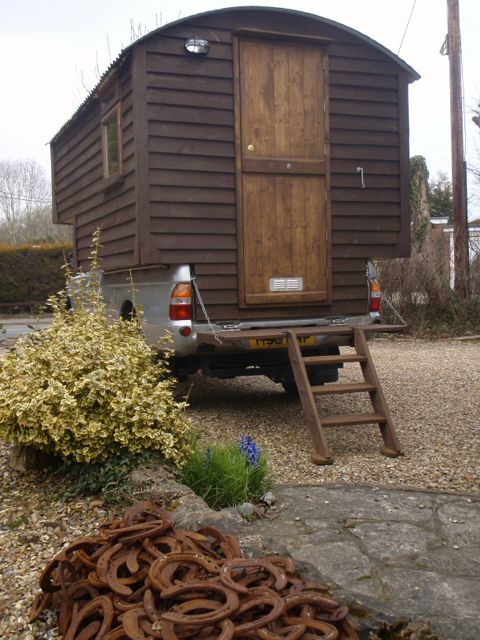
So, here she is completed. When driving the steps store inside and the rear veranda folds and locks upright forming the tailgate. It also offers even more security as it prevents the door from opening.
The finished interior, complete with "warm white" LED tape lighting


You're welcome to contact me if you have any questions
info@handmadematt.com
Keep up the great work, I read few posts on Truck Campers and I believe that your blog is really interesting and contains bands of wonderful info.
ReplyDeleteCool!
ReplyDeleteThis blog is one of the best blog on Truck Camper Shell. I will recommend this site to my all friends!
ReplyDeleteYou’ve made progress! The last time when I visit your blog, I couldn’t find satisfactory answer about Truck Camper Shells but this time you have shown a great dedication which describes your best work. Thanks for sharing.
ReplyDeleteLooks like a very efficient structure. And nice detailing!
ReplyDeleteThis comment has been removed by a blog administrator.
ReplyDeleteHow do you know how to do all this stuff?!! I'm 43 and having a massive crisis of uselessness. I've spent too many years just drawing pictures and now i want practical skills, i find i have none!!
ReplyDeleteDoes it have a bathroom? Shower?
ReplyDeleteHow much did it cost to build?
ReplyDeleteAwesome buld. Favorite part is the siding.
ReplyDeleteHello Matt. I saw your pics at doityourselfrv.com. very impressive. I am dreaming of doing a slightly longer version to live in full-time. I'm in the USA. Any tips or warnings ?
ReplyDeleteHello Matt. I saw your pics at doityourselfrv.com. very impressive. I am dreaming of doing a slightly longer version to live in full-time. I'm in the USA. Any tips or warnings ?
ReplyDeleteGreat blog Matt. Learnt lots. My project (same vehicle) plans be much lighter / simpler for just 1 / 2 nights away with horse box / horse. Making the internals very simple & removable for just a storage / toilet (ladies!) When away for just the day.
ReplyDeleteGreat blog Matt. Learnt lots. My project (same vehicle) plans be much lighter / simpler for just 1 / 2 nights away with horse box / horse. Making the internals very simple & removable for just a storage / toilet (ladies!) When away for just the day.
ReplyDeleteLike it a lot!! my next project could be something like yours..I'm going a little bigger it will be a wooden unit on a Iveco Daily pickup..
ReplyDeletehttp://nomadic-dj.blogspot.fr/p/projects.html
Guyz, I found that you made decent point on adventurer truck campers. Keep up the topic that everyone can choose one of the best answers.Thanks
ReplyDeleteHi, for your jacking points what thickness was your steel 50mm box section? I'm building something similar but want to use aluminium, i need to know if it'll be strong enough before i get a nasty surprise! :)
ReplyDeleteThanks
I like it! Very beautiful thing! thanks for sharing!
ReplyDeleteHouse removals Lincolnshire
What items do you power with your solar system?
ReplyDeleteAre you able to heat with the solar or do you use propane?
ReplyDeleteHey! Great set up. How much does the camper weigh (dry)?
ReplyDeleteIt says it came in just under 2,000lbs
ReplyDeleteGreat blog Matt. Learnt lots. My project (same vehicle) plans be much lighter / simpler for just 1 / 2 nights away with horse box / horse. Making the internals very simple & removable for just a storage / toilet (ladies!) When away for just the day......
ReplyDeleteChiller Trucks Dubai | Chiller Transportation Dubai
Very interesting blog. Alot of blogs I see these days don't really provide anything that I'm interested in, but I'm most definately interested in this one. Just thought that I would post and let you know.
ReplyDeletesurround sound headsets
Rinox ensures that all the railing components including the screws & anchor fasteners are 100% SS 304 / 316 grade.
ReplyDeleteMaterial composition is one of the most important criteria in ensuring a high quality railing which will last for decades. RINOX strongly recommends that any stainless steel used in your architectural project should be minimum AISI -304 grade.
Stainless steel railing components
Hi
ReplyDeleteHow did you seal along the leading edge of the roof/wall trim? Did you fill it with caulking of some description?
Cheers
no stripper pole?
ReplyDeleteHey Matt My name is Connie and I am in need of some advice on my RV purchase and I have been asking and cannot find much input please can you email me conniepillowspeaks@gmail.com or facebook me. I would be so grateful. Thanks God Bless.
ReplyDeleteI know this is an old post, but I was wondering if you had any more details of the connection for the cab-over section? This is where my mind can't seem to process how it is strong enough to support the weight. (granted I want to do mine over an extended F250 cab for a 6ft overhang.)
ReplyDeleteIm thinking about doing a design on a dodge ram 1500 - Curious if I can come up with something much simpler to do. No appliances, just basically a work area (In the bed of the truck) and a place for a bed over the roof of the truck... trying to save on weight as much as possible as I am restricted to 1k-1900 pounds. Any idea what just the framing weighed?
ReplyDeleteReally like that RV modification.
ReplyDeleteHeating and Cooling Scarborough
Gracias por compartir, comienzo a construir uno inspirado en su idea. lo haré sobre una camioneta también L - 200 doble cabina. Cuando haya mas avance enviaré imágenes
ReplyDeletehow is the over cab part strong enough to support itself? i'm looking to make a luton box out of wood for my van chassis,cheers,steve
ReplyDeleteLook pictures 15-17 carefully and you'll notice that there is 50mm timber pieces between roof of the car cabin and sleep cab when on pick-up truck.
DeletePS. This is very good blog and interesting to me as this hasn't been allowed in my country so far. It will be allowed next June (2020) and I'll start a project for this next spring, I hope.
i realy like it
ReplyDeleteexcelente.. genio
ReplyDeleteI love each and every part of the blog and I find this blog very useful.
ReplyDeleterv short queen sheets
Found your blog just now, Matt. Awesome camper you have there. Just wondering what tires did you use for the truck? I'm currently looking at Hankook Dynapro. How's the weight of the camper? Doesn't it prematurely deflate the tires?
ReplyDeleteThe annual commercial driver turnover rate has been at 90 percent or higher since 2012 so what can fleet owners do to mitigate this problem. Investing in retention is one of the best things you can do for your business, saving time, money, and hassle.
ReplyDeletehttps://drivematch.com/4-reasons-to-invest-in-driver-retention/
The towing business is considering high-quality times these days. Buying used tow trucks is a high-quality idea as they will be cheaper and this way you don´t need to spend a group on them. Previous to you buy one, decide which type you would want to add to your tow company. Make sure you have the needs in mind earlier than you go look for them. Since the number of vehicles on the road is increasing day by day, towing commerce will see nothing but positive growth.
ReplyDeleteThanks
Retail truck
Beauty truck
Business on wheels
Freezer Truck Rental UAE
ReplyDeleterefrigerated trucks for rent
ReplyDeleteBài viết thật tuyệt vời, thật tuyệt vời, mời các bạn tham khảo các kiến thức nha khoa >> RĂNG KHÔN BỊ LUNG LAY XỬ LÝ THẾ NÀO?
ReplyDeleteOur site provides important information on adjustable beds, sleep number beds truck mattress
ReplyDeleteLong but nice blog that covers every aspects. and you have spend so much time in it. THankyou for sharing this with us, i loved it . We also have share some information on Top 10 reasons–Why Van Life is The Best Way to Travel in 2021 . Please do read
ReplyDeleteYou have a great post, and thanks for sharing your blog. chiller van rental in dubai
ReplyDeleteBuy our closed cell foam now from Sound Deadening Store. Our Closed Cell Foam is Rigid and used as Insulation Materials in Automobiles and Buildings.
ReplyDeleteThis comment has been removed by the author.
ReplyDeleteشركات مصاعد في مصر لكي تحقق شركة مصر للمصاعد هدفها في أن تكون من أولى شركات المصاعد في مصر والعالم ، والذي يأتي بالعمل الجاد والتخطيط الجيد ووضع الاستراتيجيات التي تتناسب مع الوصول إلى الهدف المنشود.
ReplyDeletePlease share more this types of information...
ReplyDeletesoundproofing barrier mat
Your work is very unique I liked this information...
ReplyDeleteMini Electric Motorcycle
Thanks for your great share! My some doubt are cleared after reading your post about Motorhome Rental Picton, these hints are really useful.
ReplyDeletewe provide freezer van and refrigerator van rentals in Dubai, Abu Dhabi, Ajman, and Sharjah, as well as Hiace chiller van rentals. For bread, ice cream, vegetables, equipment, and our finest customers. Dubai over Chiller Van Transport Recommend chiller trucks to clients that require cold up to +5 to +10 degrees Celsius each month.
ReplyDeleteBecause of the semi Chiller Van for Rental in Dubai they have at least one more dimension in addition to many other similar features. Larger sidewalls and doors that withstand heat. As a result, the amount of heat that the cargo deck's interior heats up due to solar radiation conduction off the metal surface is reduced.
Our refrigeration unit has a high power supply and ideal operating temperature. With the help of battery power, the products remain refrigerated during transit as well. In order to prevent losing their shape, pharmaceuticals, poultry, dairy, vegetables, fruits, flowers, plants, ice creams, pastries, etc. are kept in a temperature-controlled environment. Drive Cool Transport plays a pivotal role in the seamless operation of key sectors such as food service, healthcare, and retail, contributing significantly to the robust logistics network that Dubai and Abu Dhabi are known for. Our commitment to maintaining the quality and safety of perishable goods supports not only local businesses but also reinforces the UAE’s reputation as a reliable trade and logistics hub in the Middle East. Call us at +971 52 336 9939 to discuss your requirements!
ReplyDelete